When players begin getting serious about their pickleball game, they often consider adding workouts to their regimen that are geared toward the movements made on the pickleball court.
One of the most important training tools for pickleball is circuit training, a form of body condition that combines endurance, resistance, and aerobics in one circuit.
While cardiovascular training is good for getting your heart pumping, and strength training is a great way to build muscle mass, circuit training helps you build the muscles and cardiovascular health you need for playing pickleball all at once.
In this Selkirk Pickleball TV episode, Certified Teaching Pro and NASM Corrective Exercise Specialist Dustin Davis shares the best circuit training exercises to get your body prepared for pickleball.
Exercise 1: Single leg deadlift
If you are new to this exercise, it is best to start without any weights and work your way up.
With a light weight held in your right hand, place the majority of your body weight into your left leg. Hinge at your hips, pushing your glutes behind you and lowering the weight toward your left shin.
You may keep your right foot lightly on the ground for balance or extend it behind you as you hinge. Squeeze your core to keep your back straight as you hinge.
Hold your hinged position for three seconds. Then, squeeze your glute and push into your left leg to bring yourself up to standing.
This exercise will help build your glute muscles to properly support you at the kitchen line. Improper form at the kitchen line can not only lead to errors but also lasting back pain.
Aim for the following pattern: Complete one repetition, squeezing at the top for five seconds. Then complete five normal repetitions before squeezing at the top for four seconds. Continue this until you’ve reached one and then switch to the other leg.
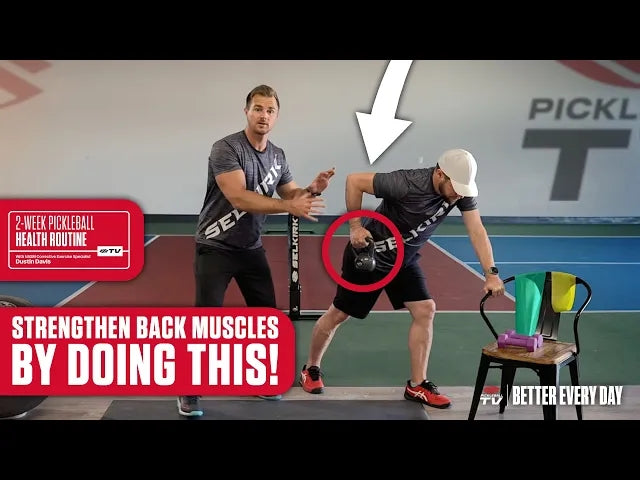
Exercise 2: Back row
Grab a light weight and find a low chair or desk to support yourself with. Hold the weight in your right hand and rest your left hand on your support surface.
Standing with your left foot closer to your support surface, hinge forward so your back is at a 45-degree angle.
Squeeze your back to bring the weight up toward your waist, gliding your elbow by your ribcage. Your hips and chest should not rotate as you pull the weight up. Hold the weight at the top for a few seconds before slowly lowering it down.
This movement strengthens your back muscles, aiding with a good posture and strong putaway volleys.
Aim for the following pattern: Complete one repetition, squeezing at the top for five seconds. Then complete five normal repetitions before squeezing at the top for four seconds. Continue this until you’ve reached one and then switch to the other arm.
Exercise 3: Hammer curls
Grab a light dumbbell and hold it vertically, as you would a hammer. Keeping your elbow tight to your side, slowly raise the dumbbell to waist height.
Squeeze your bicep to hold the position for five seconds. Then, complete five repetitions as normal, raising for two seconds before lowering for two. Once you’ve completed five repetitions, squeeze at waist height for four seconds before continuing the pattern.
When you hit a drive in pickleball, you execute it with your palm open, which places a lot of strain on your elongated bicep. These curls will help train the muscles you need for powerful drives.
Be careful to keep your shoulders lowered — do not squeeze them up toward your ear — and do not rest at the top or bottom of the motion. Complete the full pattern on one arm before switching to the other.
Exercise 4: Tricep extensions
Again, grab a light dumbbell and stand near a waist-height surface. Hold the dumbbell in your right hand and place your left hand on the surface.
Stand with your feet staggered and your left leg closer to the support surface. Hinge at the hips to bring your back to a 45-degree angle.
Start with your elbow bent and close to your side. Slowly squeeze your tricep to bring the dumbbell straight back behind you. At the beginning of the motion, your thumb should be pointed up, while in the backward position, it should be pointed toward the ground.
This movement leans out the back of your arm and gives you the strength you need for overhead shots.
Aim for the following pattern: Complete one repetition, squeezing at the top for five seconds. Then complete five normal repetitions before squeezing at the top for four seconds. Continue this until you’ve reached one and then switch to the other arm.
Download the Selkirk TV app HERE to watch the complete episode and many other Selkirk TV original shows, podcasts, lesson series from the pros, and much more.


